Showing posts with label dried floral craft. Show all posts

Wednesday, September 23, 2020

Pressed Flowers 101

 Welcome


Today’s adventure with the new Blogger 
apparently will be:
*Why can I NOT get the format to change over to center alignment
instead of
left alignment?

*Why can I NOT assign credits to imported photos?

Well the new adventure didn’t last long as I am ALREADY FRUSTRATED.

Back to blogging-

Let’s make some beautiful things while we enjoy the beginning (no matter how brief)
of Autumn.

All kaleidoscopes by inkspired and KaleidoCam app.

I have been pressing flowers from my garden
before the early snows kill them off.
I use a microwave method using
the Microfleur kit.
I just love it!

The Microfleur basic set

It consists of 2 plastic plates, 
2 clips to hold them together,
2 squares of thin cotton fabric
and 2 thick felt pads.


You lay out your flowers similar to above photo.
Make a ‘sandwich’ & pop into your microwave.
First burst: 10-20 seconds
Second burst: 10-20 seconds


A pressed flower design. Photo by Evelyn Ruhnke

I have never had to microwave longer than that.
Take your ‘sandwich’ apart carefully.
I then place the pressed flowers on paper towels 
until I am done with all I am pressing for the day.
🌸🌻🌺
Because you are pressing in such a short time,
the colors are so bright and pretty!

From a set of notecards by VT Pressed Flowers, Etsy

Pressed flower framed art is also unique and beautiful.

Another framed arrangement by Evelyn Ruhnke

Don’t want to get that fancy?
That’s okay!
You can place your flowers between 2 sheets of plastic.
Use the sturdy plastic from the front of toy boxes,
or even from clear sheet protectors.
VERY lightly dab tiny bits of glue on flowers 
and place on 1 piece of plastic with tweezers.
Tip:
It helps if you lay out your design
first, then glue.
πŸ‚ 🌾  πŸ₯€ πŸƒ 🌼 🍁
Place 2nd piece of plastic on top. You can dab a couple of places on the top of the flowers,
then press 2nd sheet in place.
Finish with some pretty tape all around the edges to hold everything together.
Washi tape works, or ribbon that is 1” wide.
You will have to glue the ribbon folded over the edge equally to make it look nice.

So Super Awesome, Pinterest

Or
Cut your plastic into an oval, circle, etc.
Then use a sharp sewing needle 
with the stitch set on long
and sew all around the edge.
A zigzag stitch looks pretty also.
Add ribbon hanger and place in a window. 

Herbarium Boutique, Etsy 

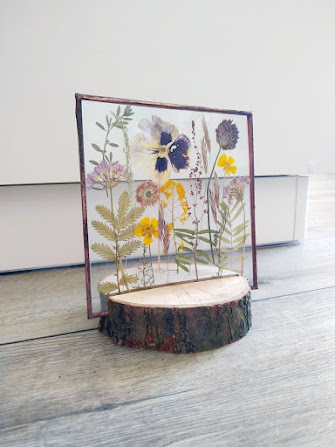
I have also used copper tape
around the edges of a glass sandwich.
The glass was leftover from smaller frames 
where I did not want to use the glass.

(Notice the simple & clever stand below?)

Another example of flowers 
displayed between panes of glass:

ForgetMeNotNature, Etsy


Let’s not forget stationery!

Found on Pinterest, but no ID.
Possibly My Humble Jumble, Etsy

Making beautiful notecards is so easy with
pressed flowers and leaves
as God through Nature does all the work for you!
Simply take cardstock,
cut and folded to your desired size,
and lay your pressed items 
in a pleasing arrangement.
Dab on glue.
Add glitter glue, paper die cuts, lace,
bits of ribbon- 
anything that pleases you,
trying to stay with flatter objects.
Happy? Glue in place with dabs of glue.
My friend S.N. uses an old cd as her palette,
and squirts a little blob of glue on it.
Then taking a toothpick she picks up
dabs of glue and glues her items.

PatsysPressedFlowers, sold on Etsy.

A gorgeous one-of-a-kind card to send!

Card by Original Garden. She has an Etsy shop.

The last pressed flower/leaf craft
I would like to share with you are
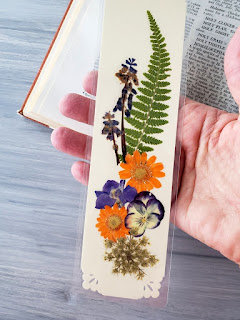
BOOKMARKS!

My Booklandia, Pinterest 

Do you have some old, falling apart books 
stuck in a corner or box somewhere?
This is a lovely way to use a few pages 
from books headed to the recyclers..


Cut pages into bookmark shape.
Back with sturdy cardstock, but nothing too thick.
Glue to pre-cut page. 
Punch a hole at the top.
Lay out your pressed flower design;
sparingly glue in place.
Brush 2-3 light coats of Mod Podge over all.
Let dry 24 hours+ in between coats.
Thread ribbon/yarn tassel through punched hole at top.
Or
Cut clear contact paper into 2 bookmark shapes,
with one being slightly larger.
Peel off backing from the first one,
and place dried flowers on the sticky part.
Carefully place sticky side down of
second slightly larger piece, 
and smooth with a brayer,
rolling pin or smooth sided bottle.
I like to do this on a thinnish shop towel,
 to help protect the pressed flowers.
Trim excess contact paper.
Punch hole in top for tassel if desired.

Brit Morin, Pinterest 

Here are some more ideas to inspire you.

My Humble Jumble, Etsy & Pinterest

Notice the stitched border:

Craft, DIY Decor, Gift, Sew and Party with Tip Junkie, Pinterest 


rose.gold.silver, Etsy and Pinterest

I hope you are able to try out the
Microfleur flower press.
(No paid endorsements, I just really like it!)
If not, get out that old telephone book
and start pressing!

‘Til next time,
inkspired

My Humble Jumble

Friday, October 7, 2011

one hundred thousand smiles, gorillas & dried florals

Yippee!!

(That's American slang for hooray, I'm super happy, great news...)


We just HAVE to celebrate!!!
I am well over
100,000 page views!!!

wow!!!


Cool!!!


Doing a little jiggy-dance now!!


You guys all happy dancing with me?


Seeing other people smiling just makes you want to smile doesn't it?

I remember, far back in the dusty region of my brain, a movie about smiles.
It was considered a 'virus' and was highly contagious.
Anybody know the name of this one?
Let me know!


I tried to get some photos of people celebrating and smiling from all over the world, just like my inkspired musings friends!
Ah, you are great people.
You have to be, because you like my blog!!!
:0)


Of course, with all this hip-hip-hoooray-ing, I have to let you know:
I am drinking lukewarm coffee from a "Grumpy" (SnowWhite & the Seven Dwarfs) mug.
I just finished my breakfast/lunch:
1 doughnut, softened in the microwave for 12 seconds
and
1 slice of cream havarti cheese;
Accompanied by....room temp water!

Whaaa?????

My temporary crowns that I got on Wednesday,
one of them cracked, broke and came off.
Not nice. Not too painful really, as long as I didn't eat or drink anything!
I went back this am to get another set of temp crowns.
More molds, more poking (but done in a nice way!)
Hey!
This could be a NEW DIET!!!

The Leave a Tooth Nerve Semi-exposed Diet

I just KNOW this is going to be a big money-maker
with many satisfied customers!
'Cause let me tell you, you are NOT going to over eat on this one!

tee hee

Okay, enough silliness!
Let's get on to a serious subject.
Today I want to share with you a Walk/Run that I have never heard of!
The Run brings in $$$ to help support the (at least 3) different programs
that are trying to save and maintain Mountain Gorillas in
Rwanda, the Congo, Uganda and others.


The Run is appropriately named

The Denver Gorilla Run

There are several good companies that help make this run a success.

You can learn more at the above link.
Here are some highlights from past years' runs:
Gorilla Runners waiting for the bus.
There is ample crowd control.
Some runners bring their own gorillas.

There are even some runners that bring their humans.

These Gorillas are sure Gathering for a Great Greet!
Mountain Gorilla in Rwanda


infant gorilla

Mountain Gorilla in Uganda

This is a very sobering fact for me -
there are only 790 wild mountain gorillas in existence.
I do think of my son. I think of the children born and unborn.
I really hate it that they may grow up in a world
with no mountain gorillas
or
Tigers
or
Rhinos
or
Black Bears
that live in the natural world that they were born to be in.

We simply must NOT let these animals down.
We must NOT let our children down.
We must NOT let ourselves down.

Do a little research
(what? you think I have time to do it all for you???)
Find an organization or Fund that is honest,
with most of the $$ going to the field work
and native workers; and education.
My first place to look would be to google
'Diane Fosser'
any organization that she runs or is involved in should be a good one.
I respect her tremendously.

Now that's something to celebrate!!


a celebration in Ghana

a celebration in Paris, France

Budget Crafts:
Let's finish up today with just a couple of fun things to do with dried florals.
These are flower illustrations that have been cut out and decoupaged onto a plain wood frame (I have seen these at Michael's, Hobby Lobby, JoAnn's Fabrics.)
I also have found wrapping paper with some wonderful images to cut out. Of course, your dried florals will be perfect for this too!
Not sure how to do it?
Just check out my tutorial on "Decoupage".
I am using glass plates in that, but the same steps can be used for wood!
Give it a base coat if you wish of a neutral color, or a bright one!
Start with laying out some larg-ish scraps of scrip -
foreign language, dictionary terms, letters, etc.
#2
What an incredibly beautiful ornament, yet so easy!
Go get out those clear ornaments you bought a few years ago to swirl paint in, and use some for dried florals. This pine tree snippet is perfect, but what about some other plant pod? A dried sunflower head? marigolds? Let you imagination expand. Could you decoupage some dried flowers on the inside of the surface?

#3

These are dried fauna that have been glued into a seashell, and then shellacked.
I would switch it up a little and use my trusty Aleene's Tacky Glue to make a miniature scene inside one of them.
Use the dried fauna, but also tuck in a little mermaid charm, a 'pearl' or two, maybe even a gold doubloon!!
If I need to seal it all, I would try Mod Podge Clear first.
Or perhaps try spraying it with Krylon Crystal Clear Sealant.
After you have done a few of these, take a nice picture,
and send it to me!
Remember, it's WAY EASY to leave a comment now!
No sign-ups. No hassles.
:0)
Time to sign off....
Thaaaaat's All Folks!

inkspired

If you haven't seen Shelly's new lattice cards,
and butterfly cards, you are missing out!
Check out her blog, listed on the right!

Sunday, August 28, 2011

Late Summer Picnics

Howdy!

(American slang, South Western USA)


'Dorothy' from the Wizard of Oz, Barbie, 2007


The kids are probably back in school,
but the days are still wonderfully hot,
beckoning all to come outside and enjoy the last days of summer.
Let's plan a weekend picnic, while we can!


Yogi Bear and friends on a picnic, Hanna-Barbera

First, we need -


SUNSHINE!!!

(all the bottlecap magnets are recycled or upcycled,
and have an Art Nouveau Alphabet that has been sized,
tweaked and generally messed with,
and then hand colored by inkspired.
These are not decals, or rub-ons.)


c.1910

The second most important thing about a picnic is
THE FOOD!!!

This can include some serious planning,
some make-ahead food items,
or
you can grab McDonald's on the way!

Either way, you MUST have a picnic blanket.
That's just part of the deal.
Picnic = Blanket and Food

Some things in life we just don't have a choice on, do we?

Now this picnic is a little short on the food.
Here's another idea: 


ah....this one's nice...

WAIT!
That's not food....that's felt!

c.1904


ahhhhh... that's better!

Now, what do we carry all that food and plates and spoons and forks and napkins and bug spray, and don't forget the blanket!?

Silly, a picnic basket!

they come in all shapes and sizes -

by Sutherland Baskets


Your picnic can be casual -


elegant....


a little more elegant, using a table
(must be portable for a true picnic however)


Personally, I think all picnics should have chandeliers....
well,
at least fancy ones I'm sure!


I'm sure Mrs. Bucket (That's pronounced 'bouquet' of course)
would approve the above accouterments.

By the way, if you have never seen the BBC comedy
'Keeping up Appearances'
you have to go find some episodes and watch them immediately!!!
Incredibly funny.

You can have a casual picnic with family and friends -


Betsy McCall with a friend


The Bear Family

Or,
you can have a more intimate picnic -


c.1905

c.1912

Okay, let's see:
*picnic blanket
*picnic food
*picnic basket
*picnic go-ers
*sunshine
...now what have I forgotten?

Oh yes!!!
picnic fun!!!

Sometimes good food and a nap are perfect,
but sometimes the picnic go-ers want a little entertainment.

Kate Greenaway
skipping ropes....

c.1854
a little picnic dancing...


flying a kite...


catch up with a little beading...

You could gather a few wildflowers
being respectful of the environment of course,

a recycled lightbulb flower 'terrarium'
or fairy house?

Don't forget to bring your flower press,
or a large heavy book with paper towels
to press leaves and flowers:


Soaps, homemade or purchased, with pressed/dried flora and fauna.

This is a simple craft; all you need is a bit of clear melted wax.
Using a light glue, tap down your dried flora onto the soap surface.
Using an old brush, brush on a thin coat of clear melted wax to seal.
You can brush on a couple more coats if you desire, making sure wax is dry before adding another coat.  Tie a pretty ribbon and fix to soap with a small straight pin, and you have a lovely, personal gift
and a remembrance of a special picnic!

Bring some mazes, puzzles and paper dolls for the kids to play with in the car, on the way to the picnic, and on the way home
(if you haven't tired them out and they are all sleeping!)


Bring some old magazines that the kids can cut up and make more outfits for the paper dolls. Throw in a glue stick, pair of scissors and you are ready for them!

Career paper dolls. I am sorry, I don't know where I found these, so please just use them for personal use.  :0)


Use those same magazines to cut strips from colorful pages,
and you can easily do some iris folding
with a tape dispenser and scissors:

Iris Folding Pattern - kite

butterfly iris folding pattern
removed at the request of bergkaarten


Well, that should give you a ton of picnic party plans,
inspirations
and ideas of grandeur!

And just think, you have all week to gather supplies
and be ready to go the first thing Saturday morning!
:0)


inkspired