Bueno!


 Pick Color #3 and do the 3rd strip.


Here are some basic shapes. With your computer editing, you can make each pattern as large or as small as you want. I am also including some finished cards to inspire you!


I also Google Images with the words


I hope you have enjoyed this little tutorial.


An iris folded hummingbird and flower.
Iris Folding is a very simple art that involves an opening in a card, such as the flower or the hummingbird above, and then folding scraps of paper, wrapping paper, envelope linings, ribbon or foil to 'fill' in the larger open area.
Talk about great recycling! Our mountains of paper trash are overwhelming us. Surely there is more that we can do to reduce it?
Well, iris folding is one small way I can help - and so can you!
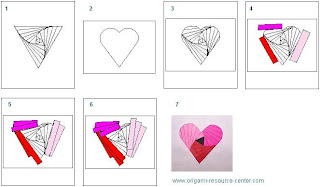
Here are some visual directions for you, from origami resource center:

Here is a simple pumpkin pattern that I will walk you through:


Card by inkspired
First, Trace the main shape onto a scrap piece of paper (I use sheets from our printer that I have printed incorrectly...upside down, missing a paragraph, etc.)
Lay the tracing over a piece of cardstock. This needs to be a sturdy piece of cardstock, not some of the flimsier ones.
Tip: To hold in place you can use blue painting tape (it has a low tack) or take a piece of Scotch tape. Tear off a small strip, and stick it to your shirt or your jeans. Peel off, and use this to hold the tracing in place. By sticking it to your shirt first, you have added just enough lint to make it still sticky, but not too much that it would tear your paper. Great hint you can use in many crafts!
Cut out the inner shape. You need to use a sharp Xacto blade for this. No cuts into the rest of the cardstock, please!
Here are some photos to help us along, even though they show a triangle pattern, the method is identical:

courtesy http://www.cardinspirations.co.uk/
Tip: You can use any die cut machine and die that has a big 'hole' shape, such as an apple, or circle. This way you do not have to cut out the inner card, the die machine does it for you!
UPDATE: I am experimenting with my Cricut Explore Air2 machine also!
UPDATE: I am experimenting with my Cricut Explore Air2 machine also!
#2: Check out your local scrapbooking store. Many have machines that you can use free, or pay a small fee to use for a set amount of time. Our local Archiver's has their's for free. They do ask you to purchase your paper there, which is very reasonable to me. Look for the discounted cardstock!!
Prepare your strips of paper. Cut them about 1" wide, and varying lengths to start with. Just cut a bunch! Fold them in half, long side.
Choose 3 different colors; mixing in patterns is just fine!
Sandwich: 1) pattern face up
2) cardstock with aperture face down
Sandwich: 1) pattern face up
2) cardstock with aperture face down
Turn your cardstock over, so the back side is facing you.
Following the numbered diagram, lay down your first strip. The fold goes toward the open middle, the open sides go to the outside (cardstock) area.
Tip: As a beginner, I found it very helpful to place the pattern down first, so it would show through the 'window', and I could see exactly where to place each strip. Use the non sticky Scotch tape hint I gave.
Your strip needs to be long enough for you to put a tiny bit of tape (NOT the lint free tape!) on both ends, attaching it to your cardstock.
As you attach each strip, you will be slightly overlapping the one below it.
Pick Color #2, and do the 2nd strip.
Repeat in this order, following the numbered diagram: Color 1, Color 2, Color 3.

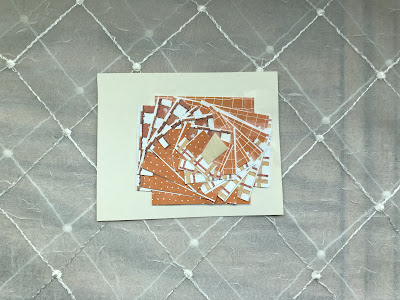
When you are done, your piece should be lumpy! That's okay!
Turn it over and make sure you haven't left any open places. If you have, you can go back and try to cover it with the coordinating paper.
Now you layer on the trunk/stem/leaves to the front of the card.
Now you layer on the trunk/stem/leaves to the front of the card.
The very center of Iris Folding is usually a piece of foil, or foiled paper.
When you are done, you look at the front and it resembles the iris of an eye, or eye of a camera.
That's where the name comes from!

To finish your piece, you need to cut a plain piece of matching cardstock and firmly attach it to the back. I like to use double stick tape all around the edges. My favorite is VivaLasVegaStamps - see the side bar for web site.

Here are some basic shapes. With your computer editing, you can make each pattern as large or as small as you want. I am also including some finished cards to inspire you!


I hope this has shown you that even though the finished cards look very complicated, the actual making iris folded cards is very simple.
I find this a relaxing craft to do while watching tv or listening to music.


Here are some beautiful finished iris folded cards:


Here is a great resource for you: http://www.circleofcrafters.com/irisfolding/
I do hope you try one - once you see how easy iris folding is, you will want to make more! I belong to a yahoo group that is very supportive, and tons of free patterns you can use: irisfolding @ yahoogroups.
I also Google Images with the words
"iris folding".
Many many ideas and patterns and samples out there!
I hope you have enjoyed this little tutorial.
Have a super super day!

inkspired
thankyou for sharing iris folding shaping greeting cards. it helps so much seeing the development , which books do not always show . thanks for inspiring. sharing on pinterest. G.Walker
ReplyDeleteThis comment has been removed by a blog administrator.
ReplyDelete