Showing posts with label baking tips. Show all posts

Sunday, May 18, 2025

A Batch of Cupcakes

 Welcome!


Let’s have some fun with cupcakes!


From simple to more effort, cupcakes are versatile and perfect for any skill level.


With the variety of box cake mix flavors you don’t even need specialty flavorings or ingredients to make a special batch of cupcakes to fit any occasion.

Here’s a clever tip to make your cupcakes taste extra special:

Ediblecraftgossip.com


Here’s a great visual on how much batter to put in each cupcake liner:


Don’t be afraid to add 1 teaspoon of your favorite extract flavor to the batter, either. If you have a Watkins rep available they have the best variety of quality extracts.

Watkins flavor extracts

For frosting, there’s nothing wrong with a can of prepared frosting. But, there are some things you can do to that canned frosting to make it special. Here is a great tip to make it go further:
I found this tip in several places, so I really don’t know who to give credit to.

You can now find icing ‘tips’ in craft stores such as Michael’s and Hobby Lobby. No need to be scared of them! A super easy way to use one is cut a small corner off the edge of a plastic bag, such as Baggies. Place the tip inside the bag so the tip just extends out of the snipped hole. Fill 1/2 full with frosting. Twist shut, and gently squeeze. The frosting should come out of the decorative tip!

Popolate 

This is also a great way to have several colors of frosting available at once. Use a different bag for each color with its’ own specialty tip.
This chart shows some of the popular tips and what they look like when used:
Courtesy Wilton Co.

This is a simple cupcake pull-apart cake. It uses just a few tips to create this cute cupcake flower centerpiece.
Angela Lavallie Tinsley, Pinterest

Here are a couple recipes to make your own frosting from scratch. Just remember if you are going to pipe the frosting on with a tip you want your icing to be stiff enough to hold its’ shape. Add a little powdered sugar at a time for the correct consistency. Stir well!

Pinterest

Pinterest

Don’t want to mess with tips? There are plenty of fun ways to decorate your cupcakes without them!

I saw this idea several times, so not sure who to give credit to. Pinterest.

Start with a plain frosted cupcake. Push colored M&Ms into the frosting to form a flower. Simple!

For these butterfly cupcakes you just need basic frosting, frosted pretzel twists and some M&Ms type candy. You can use licorice stick twists for the antennas.
ThriftyJinny.com

Here is someone else’s interpretation:


I love this next idea -


Use a basic frosting recipe and frost your cupcakes. Then purchase paint palettes at the discount store. Be creative with ‘add-ins’ and let the fun begin as guests decorate their own cupcakes.

Pinterest 

Pull-apart cakes are so easy to make. Draw out your pattern first if that works best for you. It will look something like this:

You can find scads of patterns already on Pinterest or the internet also.
After assembly it will look something like this:


Found on Pinterest

Found on Pinterest

Easy! Cute! Yummy!

A dog-themed party just needs Oreo type cookies, a little shredded coconut and chocolate covered raisins -

Use ice cream cones and mini marshmallows to make these gnomes for a Princess party, or fantasy, or woodland…


Anyone ready to throw 
It’s a Zoo Here!” party?

PersnicketyPlates

Pinterest 

…and a pull-apart cupcake creation:

Pinterest
Use mini marshmallows for the tusks, and pre-bought candy eyes. Licorice twists become eyebrows and an Oreo cookie finishes his trunk.

Sugarland Treats

Perhaps you would like to make your cupcakes from scratch. Experiment until you find a good, basic recipe. Then you can start tweaking it with special ingredients and flavorings.
Here are a few recipes:

(Let me know if this is too difficult to read and I can re-type it. I have a large screen I-Pad so things show up very well for me, but I know many peeps use their phone screen.)


…and some add-ins:


A plate of cupcakes like these are sure to cheer anyone you give them to-


Remember the plastic bag trick where you snip a small corner off? You can do the same for ‘drizzle’ frosting. Make sure your corner is cut very small. Fill Baggie with a small amount of frosting and ‘drizzle’ away. This is an easy way to dress up your frosted cupcakes in no time at all.

Taste of Home

Here are some great tips to help your cupcakes turn out perfect. I gathered these from Pinterest and various websites.

- use room temperature butter. Cut into pieces and let sit 1 hour, or microwave in 5 second intervals.

- measure flour by spooning into a measuring cup, then level with a knife. Do not pack flour.

- check expiration dates on your baking soda and baking powder. To test for freshness, take a pinch and add to a bit of vinegar. Fresh will bubble.

- let cupcakes cool in pans for 5 minutes, then remove to a rack. If left in the pans they may dry out.

My Splendid Living; Pinterest

Using simple ingredients like jelly beans, M&Ms, red hots, string licorice, candy corn, mini marshmallows, dried fruit, etc. you can decorate your cupcakes in all sorts of fun ways. 
I love these barn animals!

Want to make a flock of sheep? Here are a couple of easy options:


You can pipe on your eyes, but you can also purchase pre-made candy eyes anywhere cake/baking supplies are sold. My local Michael’s carries them.

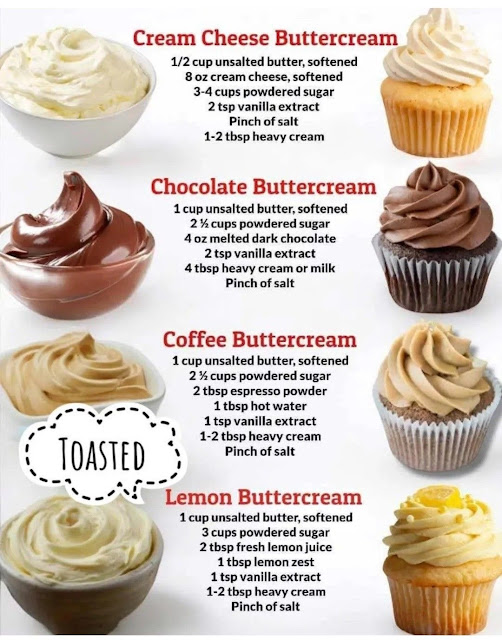
Here are a few more yummy frosting recipes -
Found on Pinterest

Let’s finish up with some super fun
Classy Shoe Cupcakes!

I found a few slightly different versions on Pinterest. None had credits.

You will need Madeline-type cookies (Pepperidge Farm makes a couple), mini marshmallows and red hot hearts, pre-made edible flowers and the long spiral cookies for heels. And frosting and a cupcake in a liner of course!
I’m thinking I might have to invite a few girlfriends over for a girl’s party night just as an excuse to make those Shoe cupcakes!

I hope you try a few of these ideas and recipes. As always, I would love to see your creations.

‘Til next time,
inkspired 

Kaleidoscope by inkspired


Thursday, May 6, 2021

The Muffin Lady

 Welcome!

All kaleidoscopes by inkspired and KaleidoCam 

After a disastrous blogging failure I haven’t wanted to attempt a blog for awhile.

I spent well over 10 hours researching, finding photos and identifying credits, and writing a blog on 

The History of Handkerchiefs.

It was a great one!

One Kings Lane 

Trying to add in a credit for a photo, blogger did its’ typical pain in the you-know-what. Then, poof.

POOF!

My entire blog was gone except the title, labels and 1 credit for a photo no longer there!

Found on Pinterest

I’ve been just sick about it.

Time for comfort food, and one of my favorites are

MUFFINS!

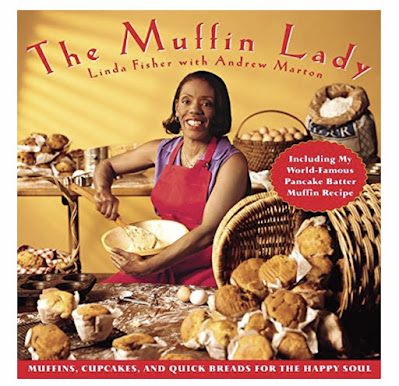
I thought today I would share a recipe from one of my favorite muffin cookbooks, “The Muffin Lady”.

Nothing like a warm, buttered muffin to make a gal feel better...


Morning Glory Muffins    Makes 6- 12 depending on size of pans

Remember to read all directions first!

My personal notes are in bright blue.

Preheat oven to 350 degrees.

Prepare muffin cups by lining with wax paper

  - just a note, I use paper muffin liners

INGREDIENTS

2 Cups flour

2 teaspoons baking powder

1 teaspoon baking soda

1/2 teaspoon cinnamon

1 teaspoon salt (yes, really!)

1/2 teaspoon nutmeg

1/4 teaspoon mace 

2 carrots, grated

1 apple grated (red delicious is NOT best choice here! I like Gala.)

1 cup oil (I use saffron)

1 cup sugar

2 eggs

1/4 cup crushed pineapple

1/4 cup chopped nuts

After setting all ingredients out, sift together dry ingredients.

Don’t have a sifter? Just mix Very Well.

Place carrots, apple, oil and sugar in a bowl and mix with an electric mixer until well blended.

Add eggs one at a time, mixing after each one. Try not to over-mix.

Gradually add the set aside dry ingredients.

Fold in pineapple and nuts. (Fold means use a spoon/spatula and fold dough over, NOT using a rough ‘mix’ or vigorous beating. Think egg shells you don’t want to break, but you don’t want clumps either.)

You should now have a lumpy batter with no dry spots.

Spoon into wax paper lined or paper liners 12 unit muffin pan.

Bake for 30-35 minutes.

When done, remove from pans as they will continue to cook if you don’t. 

I like to put mine in a towel lined bowl, and flip the towel over the top to keep them warm until serving.

If you have used paper muffin liners, cool for at least 1-3 minutes before trying to peel.

Photo courtesy epicurious, Pinterest 

Well, that’s it for today’s blog!

Things I would really like feedback on, if you have a moment:

1. Can you read this if you are on your phone? Is the print size good?

2. Are certain colors harder to read than others?

3. Would you like the text credits to be larger? Doesn’t matter?

4. Is there a subject you would like me to blog on?

5. Are there subjects you really don’t care about?

Hey! Thanks so much for your time!

‘Til next time,

inkspired


Try as I could, I did not find a credit for this photo. It’s popular! But no one seems to want to credit the photographer. If you know, please tell me so I can give proper credit.

By inkspired


Friday, May 1, 2020

Comfort Food

Welcome!
All kaleidoscopes by inkspired and KaleidoCam 

I recently made my favorite sour cream coffee cake.
I had not made that for at least 10 years!
The taste was so familiar and comforting.
I have been using that recipe for almost 40 years,
from a cookbook given to me as a wedding gift.

Perhaps you would like to try it!

Sour Cream Coffee Cake
1 Cup butter or margarine
2 Cups sugar
2 eggs
1 Cup sour cream
2 Cups sifted flour
1/2 tsp. Salt
1 tsp. Vanilla
1 tsp. Baking powder
1 Cup chopped pecans
4 Tablespoons brown sugar
1 tsp. Cinnamon

Grease and flour Bundt Pan, or angel cake pan.
Cream butter and sugar well.
Add eggs 1 at a time, beat well after each addition.
Fold in sour cream and vanilla.
Mix chopped pecans, brown sugar & cinnamon.
Set aside.
Mix remaining dry ingredients. Add to creamed mix.

Pour (glop) 1/2 of mixture into prepared pan.
Sprinkle 3/4 of pecan/brown sugar/cinnamon on top of mix in pan. Do not let mix touch sides of pan.
Top with other half of batter; 
sprinkle remaining nut mixture on top.

Bake at 350 degrees for 45-60 minutes.
(I usually bake 50 minutes)
Cool cake 10 minutes.
Loosen all sides with spatula,
turn coffee cake out of pan.

Enjoy!

From MILLER’S “Collection of Recipes”
By WJ Miller, c.1972


Do you have a favorite recipe you would like to share?
Type it in the comments section and I will share if I can!


I love this simple idea to ‘Mouse-ify ’ your pizza!


Here is a little baking tip:

After unwrapping a stick of butter,
Use the paper wrapping to grease your pan.
and
Spoon in flour to your measuring cup.
Do not shake it or tamp it down -
unless the recipe specifically says to.
Then use the flat handle of your spoon to push off 
any excess flour, making it even with 
the measuring cup’s top.


Posted on Pinterest by Get Away Today Vacations

I thought this was a really cute idea, and so easy!
I bet Oreo cookies would work also,
or any chocolate type sandwich cookie.

 Posted on Pinterest by NORTHCAROLINACHARM.COM

Another quick and easy decorating idea 
to add some Disney Fun to your cupcakes.

A little thrifty hint I do -
After any holiday is a great time to purchase
paper muffin cups
and candles.
After Christmas the stores’ candles sell
for as much as 80% off.
I find plain white, red, green, gold candles at great prices.
And
Many of the seasonally decorative paper cupcake liners
can be used at other times of the year.
My family doesn’t seem to notice
if they get red hearts in May on their muffin papers!

That’s it for today!
Let me know how you like the sour cream coffee cake!

‘Til next time,
inkspired

On my wish list!