Showing posts with label party decorations. Show all posts

Thursday, May 5, 2011

Tea Party Goodies

Good Day to All!

By Kay Chorao MarTi

This is one of my favorite paintings, so you will see me use it more than once!

Country Living has some super ideas.
I found many helpful photos and information about tea parties.
This one shows that even if you don't have a fancy outdoor table,
or mismatched chairs to make it victorian-y,
you can still adapt and have a lovely
tea party with what you do have!

That is one reason why I include Budget Craft ideas,
and Budget Decorating ideas -
Because while I may dream
 like I am a queen with unlimited funds to draw from,
the reality is I have to watch what I spend!

Okay, fine. Burst my bubble!

Really, it is in the interest of our world, not just for us, to economize,
and most importantly RECYCLE and REUSE.
So, a freshly painted picnic table can be transformed into an enchanted tea party with a few cushions to sit on and a complimentary colored cloth on top!
Add an overhead umbrella, and an inexpensive paper Chinese type lantern,
 and you are well on your way to creating some magic.

chipped teapot or teacups? Recycle them into flower vases!

for sale at the VintageDrawer shop on etsy

Let's have some wonderful, delicate and delicious things to eat at our tea party!

Strawberry and Onion Salad with Poppyseed Dressing
from 'The Educated Palate' cookbook

1 head Romaine lettuce, washed, dried, torn into bite sized pieces
1 pint (2 cups) fresh strawberrries, sliced
1 red onion, thinly sliced

optional add-in:
1 - 2 oranges peeled, sliced, with membranes removed.

Poppyseed Dressing:
1/2 Cup mayonnaise
2 Tbs red wine vinegar
1/4 to 1/3 Cup sugar
1/4 Cup milk
2 Tbs poppyseeds

First, make the dressing. Combine all dressing ingredients in a jar with a lid. Cover and shake until well blended.
Refrigerate until ready to serve. (Dressing will keep several days in fridge.)

Prepare lettuce, strawberries and onion.
Refrigerate in separate covered containers until ready to assemble.

Place lettuce on individual serving plates.
Place berries and onions on top of lettuce.
Drizzle Poppyseed Dressing over salad.
Serve immediately.
Serves 8
pepper and salt shakers for sale at APinchofJoy.etsy.com

Jicama, Radish, Mushroom and Broccoli Salad:
from "The Educated Palate" cookbook

Dressing:
3 Tbs finely chopped parsley
1/4 Cup extra virgin olive oil (yes, all those words are important!)
1/4 Cup salad oil such as safflower or canola
1 Tbs white wine vinegar
1 Tbs lemon juice
1 tsp Dijon mustard
1/2 tsp salt
1/8 tsp freshly ground black pepper
1 large clove garlic, minced

Combine all dressing ingredients in a jar and shake well. Refrigerate until ready to serve.

1 1/2 Cups broccoli florets
1/2 pount mushrooms, thinly sliced
12 radishes, sliced
1/4 medium sized jicama, peeled and chopped into bite-sized pieces
4 - 6 green onions, sliced
1 head leaf lettuce

If not using the ingredients above immediately, refrigerate in separate covered containers.

When ready to serve, toss with dressing and serve on lettuce leaves.
Serves 6
for sale at Donna's Crafty Corner 

Honey Green Grapes
from the 'The Educated Palate' cookbook

2 pounds seedless green grapes
1 Cup sour cream
1/2 Cup honey
2 Tbs brown sugar
juice of 1 lemon
1/4 Cup light rum
fresh mint sprigs for garnish

Combine all ingredients and refrigerate.
Chill at least 2 hours.
Serve in wine goblets, garnished with fresh mint sprigs.

for sale at JDBridgers.etsy.com

I love this next recipe just because it sounds so English!
It also has cream cheese, so I know it will be delicious.

Strawberry and Devonshire Creme Brule'e
from 'The Educated Palate' cookbook

1 8 oz package cream cheese, softened
1 Cup sour cream
1 tsp lemon juice
1 pint (2 Cups) sliced strawberries
4 Tbs brown sugar with a sieve

Have everything laid out, pre-measured.
Preheat broiler.

Cream together cream cheese, sour cream and lemon juice until smooth.
Fill each of eight 6-oz custard cups with 1/4 Cup sliced strawberries.
Spread cheese mixture in an even layer over strawberries to cover.
Top each layer with a thin, even layer of brown sugar. (This is where the sieve comes into play).
Slide under broiler, heating just to melt the sugar.
Serve at once! or chill up to 1 hour before serving.
(I think it is best when the sugar is warm and just melted.)

for sale from 22BayRoad.etsy.com

This next recipe is so much my Grandma.
She was a pioneer into Kansas when she was little. She remembered riding in the wagon pulled by steer. Their first house was a sod house - dirt floor that she had to sweep every day, and cut sod for a roof. Very primitive. She lived through the Dust Bowl days. (A terrible time for those who lived through it).
She ended up on a farm outside of Dodge City, Kansas. During crop time, she would bake hundreds of biscuits every morning for the crews that came through to harvest the wheat. Then she would cook a huge batch of something for lunch. These workers worked hard, and worked up a humongous appetite! Farm life was hard, but I never heard Grandma complain.
Before she died she had traveled on a covered wagon, on a train, and then an airplane! She would marvel at all that God had led her through.

Grandma McDowell would come visit us for several weeks each year. It was never long enough, as far as I was concerned! Grandma was the BEST baker and cook you could have. She made wonderful, totally from scratch, pies. She made homemade noodles. I remember them hanging all over our counter as they were cut and drying!
Whenever Grandma made a pie, she knew how hard it was for us to wait for the yummy to come out of the oven, so she always made Pie Crust strips, sprinkled with cinnamon suger. They were done in just a few minutes, while my sister and I watched the oven. 
Following is a very simple recipe from a Pillsbury Classic Cookbooks leaflet.

Pie Crust Cut-Outs

15-oz package Pillsbury All Ready Pie Crusts  (this comes in a red box in the refrigerated section)
1 tsp flour

Flavorful Toppings:
Sugar
Colored sugar
Cinnamon-sugar mixture:
    1 Tbs sugar plus 1/4 tsp cinnamon
Colored or chocolate sprinkles
Garlic or onion salt
Grated American cheese (we like Co-Jack)
Cheesy-seasoning mixture:
    1 Tbs grated parmesan cheese plus 1/2 tsp Italian OR Mexican seasoning.

>Allow 1 pie crust pouch to stand at room temperature for 15 - 20 minutes.
Refrigerate remaining crust for later use.
Heat oven to 400'.
Unfold pie crust; peel off top plastic sheet.
Press out fold lines with fingers, sprinkle flour over crust.
Turn crust, flour side down, on cutting board or pastry cloth;
Peel off remaining plastic sheet.
Using 2 inch floured cutters, cut out desired shapes.
     (Grandma just cut hers into strips and long triangles)
Place 1 inch apart on ungreased cookie sheet.
Reroll trimmings, if desired, and cut more out.

Bake at 400' for 6 - 9 minutes, or until light golden brown.
Store loosely in covered container.
Yield: approx 32 snacks

YUM    YUM    YUM    YUM    YUM!

from AtomicTeaParty Blogspot

Well, this blog is getting to be a book, so I will close for now!
Will there be more Tea Party fun in later blogs?
Most probably!!

from justtoocute.com

inkspired

Feel free to contact me with you own tea party pictures,
or Budget ideas, or pix of your family dog!

Thursday, April 14, 2011

Decoupaged Glass Plates tutorial

Hello all,
Well, today I am going to jump in and try my hand at showing a tutorial. The project is super simple with the right tools and product.
Don't even talk to me about doing a video!


Decoupaged Glass Plate Tutorial:
you will need:
   clear glass plate clean, oil free (fingerprints, etc.)
   ModPodge matte, gloss or glitter!
   sponge brush
   glass of water for glue brushes
   plastic lid or plate to pour glue into
   damp rag/paper towel for finger clean up during project
   newspapers to cover your craft surface
   craft mat or placemat size rectangle of waxed paper
   pretty napkins
   sharp scissors

Step 1
  Spread newspapers, wax paper etc. to cover work surface
  Get damp rag and place in a bowl or on plastic plate/lid
  Prepare napkins:
      remove extra plies so you have only one ply of decorated napkin. You can use the leftover white napkin plies in later steps and also use them as napkins!
Step 2
   Cut motifs from napkins. Cut many more than you think you will need!
Very Important: lay out your napkin cuttings frequently so you have an idea for placement. Continue to do this as you cut.

Do your final placement layout.

Now is the time to trace and cut out a background sheet of tissue paper or napkin. This is when the other napkin plain plies will work well.

Set aside.

Step 3
   Pour a glob of ModPodge onto plastic lid.
   Place clear glass plate FACE DOWN.
   Spread a little glue to cover where you want to put your first napkin cutting.
   Place napkin cutting FACE DOWN, and dab more glue on with brush.

tip: remember that you will be placing your motifs down from the front to the back.
Example - if you are gluing down a watering can full of flowers, you will first place the watering can down. Then you will place flowers on top of that, so when finished the flowesr will be inside (or behind) the can. Then you will place any clouds/sky on top of the flowers, so the finished scene will look like clouds in the back, flowers in vase.

   Continue spreading a little glue, placing napkin motifs and dabbing with more glue until all your first pieces are in place.


Problem?  It is very easy to tear the thin napkin pieces. You can smoosh some of them together with the wet glue. Hate it? Remove it quickly and do another piece instead. Or, make the tears part of your overall look, and be sure to do more of them. Think crackled Venetian vases or old paintings.

tip: make sure all the napkin pieces are covered with glue.

Step 4
Set aside on wax paper. Let dry.
Now is the perfect time to start on another glass plate or bowl, while your first is drying a bit.
Here, my lovely assistant Pam is starting on a small bowl. She has cut out a few pansy motifs from one napkin, then has taken another blue striped napkin and torn it into small strips.
Remember! You are gluing napkin pieces face down onto the bottom outside of the bowl.
Pam has glued a few pansy motifs first, and is then applying blue strips on top of them.

Step 5
Pick up your dry/wet glass plate carefully.
Get the set aside one large piece of tissue paper/napkin that you have cut out.
You can now apply the covering "back" layer. This usually goes on top of all your glued pieces, but doesn't have to. Play around with looks, but do this BEFORE you start gluing things down! It is very difficult if not impossible to remove motifs once the glue has started to set (which is within seconds sometimes!)
Remember your steps: Put down a layer of ModPodge first, being careful not to tear or smoosh the already glued down motifs. Then place tissue paper/napkin on top and dab glue to cover it all. If you don't get glue everywhere on this step, it will leave a dry spot that is okay but doesn't look great!

This plate is drying. After first layer of napkins, I am now adding a layer of yellow behind the lion, and torn strips of light blue and white napkins around the edge.

Step 6
Set aside to dry thoroughly.
Go back to your second bowl, plate or whatever, and apply finishing touches.
Here is a Happy Birthday bowl that I made.
Here it is done, but drying:

Here it is dry, and shows you the unfinished edges where the tissue paper is sticking up. I actually did this on purpose, to give a finished edge when I am done .
 
Here I am holding the bowl up to the light so you can see it at a different angle.
I used a mixture of matte ModPodge, and glitter ModPodge.

Step 7
Finish up any decoupaged pieces you have more steps to do.
If you want to do a small piece now you can decoupage small candle cups, or in this case, we used mini clay pots:

Here are the finished products:

In the above 2 photos you can see the mini bowl and the bunny plate still need their edges finished.

Step 8 Final
Take an old emery board or file. File off the tissue edges that are sticking up away from the rims. Smooth the edges with the file, as needed.
Well, just hmmmm. I have no idea why this particular picture is tipped wrong. It isn't in my saved files that way! Sorry, guess you will just have to turn your head or hold your monitor up sideways!

Here are our finished samples:


 Oh just ick. Guess that is what learning new things is all about! I will have to play with this photo issue, but I do want to get this wonderful and easy craft to you, so please just bear with me, and do that crooky neck thing!

This is the plate I did years ago:
front:
back:

 laid down on  white napkings to show detail:
Yes! Those pansies and leaves are from a napkin!!

Here are some last minute finishing tips:

These are decorative plates and not meant to be washed. If needed, you can wipe the glass surface with a damp cloth, and dry immediately.
They are NOT food safe unless you spray with food safe finish.

The back side can often feel 'sticky', even after it is dry. Use a clear acrylic spray to eliminate this. I like Kryon.

Check and see, I believe there are food-safe sprays that you can use! After spraying with this kind of spray, you can put food on the plate, but still only hand wash with very mild soap and rinse with a damp rag.

If you can't find the food safe spray, or just want to use the clear acrylic spray, that's fine. You can put wrapped candy on you plate if you wish. You could use it as a serving plate for pre-wrapped tea bags, or 3 little tea cups. How about a creamer/sugar set?

I think the birthday bowl would be a great place to anchor some birthday balloons!

I hope you have enjoyed my first tutorial.
Print these out on sticker paper, and have fun decorating cards, lunch boxes or Easter eggs!

inkspired


Monday, March 14, 2011

Day 4 countdown St. Patrick's Day +

Good morning!
An Irish Friendship Wish

"May there always be work
For your hands to do;
May your purse always hold
A coin or two;
May the sun always shine
On your window pane;
May a rainbow be certain
To follow each rain;
May the hand of a friend
Always be near you;
May God fill your heart
With gladness to cheer you."

RUBBER STAMPING
Today I thought we could explore the wonderful world of rubber stamping together. I am still amazed when someone says to me "Rubber stamping? What is that?". I have been rubber stamping since 1983 or so, starting out self-taught as there really wasn't that much information out there about it. I have been teaching rubber stamping classes for a couple of decades! Wow.

In the back of a craft magazine I found an ad for a company named "Bizarro", that had rubber stamps. I saved up my money and sent off for the catalog. I think I may even still have it! The pages became very dog-eared and worn what with me reading and re-reading every page of quirky images.

To illustrate how much rubber stamping can be economical, I still have that original bottle of copper embossing powder I purchased for my first batch of home-made-rubber-stamped Christmas cards. I also still have the stamp I used. Both are still quite usable!

To illustrate how much rubber stamping can be outrageously expensive, I now have an entire room dedicated to my hundreds of stamps, thousands of sheets of paper and cardstock, and dozens of bottles of embossing powders, fun flocking, pearl ex, embellishments....well, the list could go on for quite a while!

How sweet it is!
hand stamped and colored domino magnet by inkspired

"The person born with a talent they are meant to use
will find the greatest happiness in using it."
- Goethe

Let's start with a fun rubber stamping project for any level stamper!

St. Patrick's Day Party Cupcakes

The fun baking part-
To do ahead:
Make a batch of cupcakes, let cool.
Frost with green frosting. If you can't find any pre-made, simply use a can of prepared white frosting, and drop in JUST A COUPLE OF DROPS of green food coloring. Really, just a couple. Mix well. You can always add more food coloring a drop at a time.

Sprinkle frosting with green tinted coconut to simulate grass.

How to tint coconut:
Add a few drops of food color to coconut in a jar; shake until evenly tinted.

The fun rubber stamping part-

Find a simple rubber stamp with an Irish theme - shamrocks are great. The image should be no larger than 1 1/2".

Purchase a good ink pad. Go ahead and invest $7 and get a green one. I like Stayz-on, Brilliance or Marvy Matchables.

You will need a pack or so of lollipop sticks. You can find these anywhere they sell Wilton cake decorating supplies (I get mine at JoAnn's Fabrics).

Now you want circles or squares or ovals of plain cardstock.
You will also need the same amount of green cardstock cut into shapes. 
There are many hand held punches in these shapes.
For more addicted stampers, there are the cuttlebug or cricut machines, etc.
Or you could do the old fashioned but really cheap way, and trace around a bottle or jar for a round circle, and cut out.

Ink your stamp lightly. No grinding, pounding or smacking.
Stamp your simple image onto scratch paper first to practice, then stamp onto the shaped plain cardstock.
Pretty!
Let dry or help it along with an embossing gun to set ink.
No, a hair dryer won't work.

Now make a sandwich:
Shaped and stamped plain cardstock circle face down +
    blob o' glue, with lollipop stick in the center +
        shaped green cardstock.
Press to secure lollipop stick. Let dry.

alternate - you can tape the lollipop stick in place and then glue the green card onto the back.
Or, you can put a dab of frosting on back side of stamped circle, and push lollipop stick into that, then a dab more frosting and squish the green cardstock in place on top.

Go clean your stamp. Using an old washcloth or tube sock, dampen the cloth. Dab your stamp repeatedly onto it and slightly scrub until no more green comes off. Then stamp several times onto scratch paper to make sure there is no more ink leftover. Your stamp should not be wet.

For extra pretty, tie a thin ribbon bow at the base of each stamped circle, around the lollipop stick.

Push one decorated lollipop stick into each cupcake.
Ready to go!

Fun extra - if this is for a school party, you can write the name of each student on the back, plain green cardstock side to personalize!
"If you're lucky enough to be Irish,
then you're lucky enough."
inkspired


Saturday, March 5, 2011

Mermaid Madness

Hello!
Anyone who knows me knows how much I love mermaids!
I'm not sure why. Perhaps the fantasy part, or the being free in the ocean part.
They have characteristics very much like dolphins, or manatees. (Yes, these two sea animals are favorites too!)
I love the way mermaids have been portrayed down through history. Sometimes evil - like the mermaids Sinbad's crew tangled with, but mostly happy and just enjoying be pretty. Sounds good to me right now, as I sit in a frumpy outfit and my hair needing a wash!
So, let me give both you and I some mermaid madness.

Unfortunately, many of my mermaid gatherings I do not have proper names of who did what. Please forgive me. If you know who did a particular painting or graphic, please contact me so I can give credit where credit is due.

Here is a treasury of mermaids that I have put together on etsy:

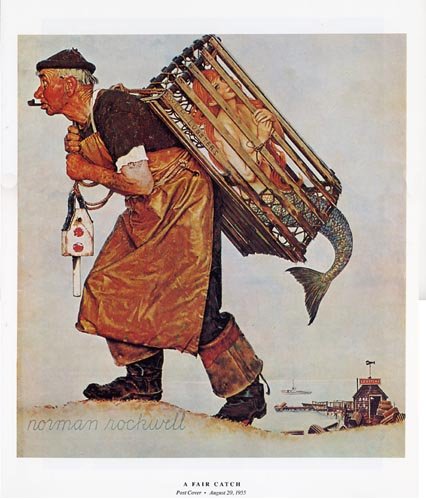
This next one is a painting by one of America's most beloved painters -
Norman Rockwell.
little fact: All of his paintings were first photographs that he would set up. He used people from his home town. After photographing, he would get down to the business of painting. Remarkable!
"I sat upon a promontory,
And heard a mermaid, on a dolphin's back,
Uttering such dulcet and harmonious breath,
That the rude sea grew civil at her song;
And certain stars shot madly from their spheres,
To hear the sea-maid's music."
- William Shakespeare

Here's another one of my mermaid treasuries:

she is from calamitykim's etsy shop

Easy MERMAID! Party Decorations:

Cupcake Picks.
These are so incredibly easy to make, and yet if you buy them from the store, they are not cheap!
Solution: make your own! If you have kids, you can let them be part of the preparing for the party, and do this all together as a family activity.

Things to get ready:
~bake cupcakes according to the box directions.
~You can use any old muffin liner, or just grease the cups. These will be placed into a fresh clean liner before finishing the project. Those new silicone muffin pans work pretty well too.
~Set out frosting so it is room temperature when needed.
~Have toothpicks ready to use. I like the multi colored ones you can buy at the grocery store. They are smoother and a tad longer.
~Have pretty, colored or themed cupcake liners that you will be putting the finished, decorated cupcake into.
~Check out the cake sprinkles available now! I find mine on the mark downs at JoAnn Fabrics, and the grocery store. Look in the Wilton or cake decorating aisles.
~Card stock.
~glue, like Aleene's Tacky glue in the gold bottle.
~Circle punch or die cutting machine with circle die.
~various stamps and stamp pads to go with the mermaid theme.

Here are a few of my favorites that I have made into cards:


(Notice that both these mermaids have been "framed" with kirigami cuttings, and then glued onto plain card stock.)

I love all the different mermaid stamp images you can find from numerous companies. One of my favorite stamp companies:RubberStampAve.
Here is their internet address:
(they have way cool pirate stamps too!)


Okay, let's get to playing and eating cupcakes!

Stamp your mermaid image, or matching word, onto a piece of plain card stock. You can use solid color, or pastel colored patterns. Nothing too bold for the patterned paper, or the stamped image won't show up well.
Cut this image into a circle. You can use a circle punch, or a die cut machine with a circle die. Suggested size is around 1 1/2" to 2".
This was your practice one. Do you like the image? Does it fit well?
hint: a scallopped circle for a girl's party looks really nice
Now stamp and cut out 48 - 72 (2 dozen cupcakes to 3 dozen, double sided). Adjust amount to how many cupcakes you are making. You will also want extras to turn into badges (the kids can take home), glass rim embellishments, party decorations, gift bags....this little circle can be used in so many ways!
Decide if you want to color in the mermaid, or leave her plain. For quick work, of course, just leave her as is. If you want to color her in, you can use markers, colored pencils or chalks.

After preparing 48 stamped circles, you can match them up. I like an image on one side, and a word on the other. Place one circle face down on a craft mat.
Method One:
Put blob of glue in center. Place toothpick in center of glue. Make sure the toothpick has at least 2/3 of length below the circle, sticking out. Adjust where you put the blob of glue accordingly. Now press the 2nd circle face up, matching circle edges. Press well, but not so hard that you indent the card stock.
Method Two:
Get some double sided foam tape, or foam dots. Cut into small square or use dots as is. Sometimes this is called framing tape. You can find it in all the crafts/stamping/scrapbooking stores.
You will need 2 dots for each cupcake decoration.  On the face down circle, place one dot of foam tape near center, closer to the bottom. Again, make sure your toothpick is sticking out for around 2/3 of its' length. Place toothpick on top of dot. Place second dot on top of that. Press into place the 2nd circle.
OR
if your foam tape is skinny enough, you can put a piece of double stick dot on back side of circle. Add a dab of glue next to it. Place toothpick into glue. Place second dot right next to the toothpick. Peel off backings, and press 2nd circle in place.
Advanced Stamping tip:
To make a colored stamp image, like the mermaid in the second card, above, you need fairly juicy markers. Hold the stamp up, rubber side up. Stroke ink onto the raised lines with your colored markers.
LIGHTER COLORS ALWAYS GO ON FIRST.
When you have finished, and really, don't fuss or make it too many colors or details, you "huff" on the stamp, and then press to paper.

Now, my sister tells me that "huffing" is not a nice thing to say, as it usually involves drugs. Hmmmm......
 but I refuse to let a few degenerate druggies tell me what perfectly good words I can or cannot use.
Besides, you know what I mean when I say "huff", right? Not blow on it, but use the air from your mouth/lungs like you do when you give a big sigh.
I can get  up to 3 good imprints with this huffing method.

TIP #2: Take a fine mist spray bottle with water in it. Hold stamp out and away from your table, and spray one squirt of water. Stamp image. Stamp again. Sometimes with another squirt of mist you can get even more stampings.
Play!

These cupcake decorations are so easy to make. There are many steps that children can easily help with. I haven't detailed any as I think each of you with kids knows what your kids can and cannot or should not do.
You can place the picks into the frosted cupcakes any time you choose.
Since we are on the mermaid theme, I would frost with pale blue frosting, and place a few sugar fish confetti in the 'ocean' for fun.


Ned Land in 20,000Leagues Under the Sea,
singing:
"Got a whale of a tale to tell ya' lads, a whale of a tale or two,
'bout floppin' fish and the girls I've loved
on nights like this with the moon  above. 
A whale of a tale and it's all true,
swear by my tattoo.
There was a Mermaid Minnie; met her down in Madagascar.
She would kiss me anytime that I would ask her.
Then one evening her flame of love blew out,
Blow me down and pick me up,
she swapped me for a trout!"
woman in restaurant:
"If we are going to pay this much for crab
it better sing and dance and introduce us to the Little Mermaid!"
- unknown


"Clark Gable was the first to have called me a mermaid."
 - Esther Williams

I hope you have enjoyed this small insight into my mermaid love!
inkspired